Monthly Archives: December 2011
Say Yes to Ostentatious Winter Lips
Buh Bye Chappy Lips!
Ugh winter is here! Well, at least for me is depressing. The one and only season were most people decide to hibernate. Also the period were our skin gets dry and screams for moisturizer, pleaseeee. I remember when small I use to get these horrible winter burn mustache on my upper lip- the Lip Licker effect and my only salvation of the burn will be Vaseline’s Lip Therapy lip balm.
During this beautiful, snowy season (feel my sarcasm) we are likely to also suffer from dry lips. Winter’s dry air and lack of moisturizer leave us victims of scaly, dry, nasty, ugly-looking chapped lips. Do not fret! Below you will the simplest steps to tone this unwanted winter look. Go ahead, start gathering your tools and massage your lips back to a kissable state.
Tools:
- Petroleum Jelly
- Soft Toothbrush OR Eyelash Spool
Steps:
- Apply a coat of petroleum jelly to lips
- Use a dry, smooth toothbrush and massage your lips in a circular motion to remove the dead skin cells
- Remove any excess of petroleum jelly
- Apply lip conditioner (I use Blistex Lip Medex)
- Enjoy your new, restored lips
During this process the toothbrush is exfoliating your lips while the petroleum jelly is hydrating and healing. If need be, repeat the steps several times until lips are no /chapped and back to a kissable status. Make sure to protect your new polished lips with a moisturizing lip balm.
Don’t lick your lips & hydrate yourself (8 glasses of water),
Mel G.
Makeup Brushes 101 Class
Tapered? Angled? Flat? Blending? What the BRUSH???
I was once in your position, totally lost with the vast amount of brush options. For my Bellas and Bellos that have never gone beyond using the typical brush that some makeup brand comes packaged with. I want you to embark on a ride to Brush Crush World because after this ride you will be falling in love with how these babies can rank up your look.
You don’t necessarily have to stick to the category I have placed the brush(es) under. Depending on what look you are aiming for, you can go ahead and break “my” rules (haha). For instance, you want to highlight a particular small area on or above your cheekbones go ahead and use the tapered eye brush. It will apply a soft look and simulate Sofia Loren beautiful, high cheekbones. Ok, not literally like hers but you get the point.
Below I’ll list what I believe are the essential tools to start your own makeup brush collection and start witnessing flawless application. Each brush can serve many purposes – you can have a brush that can be used for your eyes as well as your lips or even face. I will make reference to which brushes have multiple duties.
Where can I buy makeup brushes??? You can buy them at most cosmetic stores or online such M·A·C, Sigma (online), Crown (online), Urban Decay, and SEPHORA just to name a few. If you’re near a pharmacy, Duane Reade sells eco-friendly brushes; I specially like their powder/blush brushes. A little insider: when I began my journey as a Makeup Artist, I actually started with paint art brushes which I purchased from Michael’s arts and craft store!
Eye + Face & Body + Lip Tools
- Tapered Blending Brush – Works well on creases and helps to achieve smokey eye looks. You can also use this brush in areas of your face that you specifically want to highlight.
- Eye Shading Brush – Helps to build up shadow on your eyelid.
- Blending Brush – I love this brush! It does exactly what its name after, blends, blends, and blends! It helps to blend powder/cream shadow harsh lines when applying more than two colors achieving a smooth, natural look. You can even use it to blend your blush, bronzer, and highlighter- there’s basically no limit. The brush is a keeper in your makeup kit.
- Medium Angled Shading Brush – Can be used on your brow bone to apply highlight. I also tend to use it on my crease to create more depth and inner or outer corners of my eyes.
- Angled Eyeliner Brush – Helps to define (shape & darken) eyebrows and apply powder/liquid/creamy as eye liner. You can also use it to add shape to your eyebrows. Tip: When using eye shadow as eyeliner and you wish to intensify the look (1) wet the brush with a bit of water or M·A·C’s Fix+ Spray (2) dip brush in your eye shadow of choice (3) darken as many times you want depending on the look that you’re aiming for
- Small Eyeliner Brush—Helps for precision application, specially the cat/winged eyeliner looks.
- Powder/Blush Brush – Applies blush or bronzer to cheeks. As well as pressed powder or bronzer or loose powder on the face. You will find different sizes available which will help pick the right amount of powder for desired sections.
- Large Angled Contour Brush – Helpful to apply powder and contour cheeks. The brush hair doesn’t pick up too much color and due to its shape, it makes it easier to blend (angled).
- Kabuki/Buffer Brush – I tend to use this brush to apply pressed powder or sometimes loose powder. It’s also used to apply powder on the body.
- Concealer Brush— Looks like a mini version of a foundation brush- it’s an under-eye friendly tool. Why? It has a more delicate application versus tugging or pulling on the area which is recognized to be the most sensitive part in your face. It helps to apply concealer to those hard to reach areas (around your eyes).
- Foundation Brush – Applies a natural finish look on the skin. The brush construction helps to apply large amounts of makeup on our pretty face.
- Lip Brush – Defines lip’s shapes and blends lip liner and lipstick. Helps to define the sexiest part of your lips- the cupid’s bow. Tip: You can also use an angled eyeliner brush to highlight the cupid bow.
Honestly, I don’t know how I survived years ago doing my makeup without these handy tools. Lastly, remember to take good care of your brushes. I’ll soon provide a blog on how to clean these hairy tools. Stay tuned.
Brushing my shoulders off, Peace.
Mel G.
Makeup Tools
Difference Between Everyday Makeup & Fashion/Runway Makeup
What are the first few words that come to head when ‘fashion makeup’ flashes before you?
Drama. Free spirit. Diva. Color parade. Flashy. Glittery. Feathery. Creative. Intriguing.
How about everyday/regular makeup?
Simple. Natural. Soft. Young. Innocence. Clean. Radiant. Light. Beauty.
Most of us apply everyday makeup because its:
Simple
Easy as 1.2.3, fast application
Enhances our natural beauty
Hides scars, pimples and unwanted blemishes
You won’t find many of us strolling down the street heading to work or running errands with heavy makeup and have people questioning “Where is she going?” If you’re in that pool of courageous souls, hey it’s your own prerogative and I applaud you. However, I’ll save vibrant, rainbow, dark looks for holidays or special events (i.e. Halloween, birthdays, New Year’s).
For a natural look I usually prepare my face by applying (1) Pressed Powder by MAC (2) matte Bronzer by MAC to contour and give myself some color. I make a fishy face and apply it right were you see the dent. This will give the illusion that I have beautiful, high cheekbones (3) and in a circular motion I apply a peachy color blush on the apples of my cheeks. I tend to smile and start by the side hair line and work my way to down to my cheeks.
Moving on to the eyes, my ultimate favorite feature to work with! Thankfully, I was blessed with big, beautiful eyes giving me lots of space to work my magic. A little secret, I didn’t like them when I was younger because of all the teasing I used to get. But ok, back to business. I use MAC Grain Satin eyeshadow (shown on my picture above) on my entire eyelid with a light application of MAC Down Brown eyeshadow on the crease. The crease is the line or fold below your brow bone or the top of where your eyeball ends. I top the look with CoverGirl Perfect Point Eyeliner in Black Onyx to line my upper lashes, plus a swipe of liquid eyeliner on top of the pencil eyeliner; and finish it off with Maybelline Turbo Volume mascara. I fill my lips with MAC Angel, a nude lipstick with a hint of pink and coat it with MAC Revealing lipgloss. Smooch!
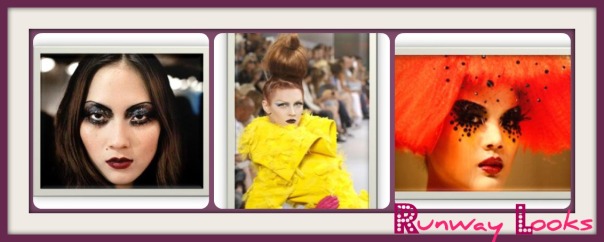
Now Fashion makeup will transform an average Jane Doe to the next Nicki Minaj. As most of you may have noticed runway makeup tends to be sometimes dramatic in the sense of pigment and texture, this helps the makeup to be viewed better from afar where the whole look needs to be noticed by the audience. Therefore, when applying makeup for such look, you will add little more than what you are usually used to (i.e. blush, eyeshadow, eyeliner, mascara, and can’t forget dramatic eyelash extensions). The direction of fashion runway clothing goes hand in hand with makeup because it aids to interpret the trends that will have everyone going
Uuuuuu! Ahhhhhhh! I sooo want that piece!
Mascara, lipstick and eye shadow,
Mel G.
Lip-lip-stick Frenzy, Dare!
Who dared this past summer to open up and let their daredevil free with all the awesome, exuberant, color-popping lipsticks?… I DID!
I was sooo styling my outfits with MAC’s Morange (bright orange), Impassioned (bright pink ) and Ruby Woo (matte red). I have even inspired some of my friends to explore couleurs on their lips (Oh yeaa!).
Whenever I want to rock popping lips I pair it with a light eye and face palette. What do I mean by this? Well, I don’t go heavy on the eyes (i.e. smokey eyes, dark eyeshadows). I apply a neutral base shadow like MAC’s Grain on my entire eyelid + light brown shadow on the eye crease to create depth such as MAC’s Brown Down with a hint of MAC’s Tempting…make sure to blend, blend, blend. Lastly, I use a semi shimmery highlighter on my brow bone like MAC’s All That Glitters which will help to define my eyebrows. I top it off with a winged eyeliner and two coats of Maybelline’s The Turbo Volum’ Express mascara. Voila!
Years ago, during my wonderful college days, I remember repeatedly saying that I will never wear pink lipstick and even worse RED! [Piece of advice, never say never, but I’m pretty sure you’re aware of this by now]. I simply thought that the colors were too bright which left me feeling exposed and placing focus on my big lips. However, it all changed when I tried a pink lipstick that my Mami gave me before leaving to college, were that bad boy sat in my cosmetic bags for yearsss! Anddd <drum rolls, please> I ab-so-lute-ly loved it! I was pairing it with most or all of my black ensemble outfits.
On a side note, I read an interesting article which I unfortunately don’t remember the source. It stated that red lipstick actually gives the illusion of smaller lips. Huh?! That’s correct. Just like we have our little black dress, blazer, or pants to hide unwanted areas to make us look slimmer – Red lipstick does the same for us blessed with big lips.
Well, Makeupnista I leave by daring YOU, the person who’ll never wear color on their lips to go out there and explore and be free! Free to give things a try. Free to express yourself, even if it is through makeup. Free to give yourself a chance. I pinky promise it won’t hurt. If you do, which I know you will get the courage- go right now and take out that new, freshly purchased vibrant color lipstick; and spread it all over your anxious lips. Don’t forget to feel free to share with us here the color you lip-tackled.
Pucker up and lip smack next summer with coLor,
Mel G.
Yummy, Edible MaKeUp
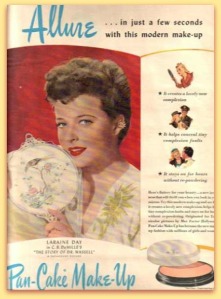
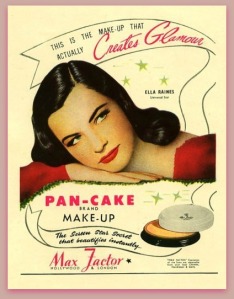
Can you believe that back in the ol’ days pancake was used as facial makeup! Yup, you had to get down in the kitchen to look flawless.
Just kidding, I’m referring to pan-cake as the makeup that’s typically used in the theater and film industry. Pan-cake is a compressed matte powder applied with a moist sponge- providing full coverage to the face. However, you have to be careful of how much you apply, if not you could end up looking un-real and fake; and your goal is to rock an au natural look. This pancake makeup phenomenon rised when actors appeared in film with blue, yellow and red tones on-screen. Pancake foundation helped actors appear with a near to flawless skin on the screen. Most MUAs (Make-Up Artists) use this type of makeup for complete coverage or not so ‘perfect’ skin such as scars, blemishes, skin discoloration, tattoos etc). It accomplishes to have an even + smooth + flawless skin finish to many of our clients. Make-Up brands such as M·A·C, Max Factor, and Make Up For Ever carry this full coverage foundation products. Here is a helpful link on how to apply pan-cake makeup: Pancake Makeup Application.
So, hold on to your horses because you won’t believe this one. In the mid 1920s cosmetics advertising was rejected in women’s magazines?! Say what? Noo, wayyy. Come again? Nowadays, we are flooded, bombarded with new make-up products promising amazing results. Mascaras that elongate, fills, volumizes your lashes; foundation that matches your true skin color; lips enhancements and I can go on and on. So ladies let’s take advantage of all the hard work our makeup ancestors fought for. But pretty please be cognizant of how much pancake foundation you apply, you don’t want to end up looking like these infamous ladies:
Hope you learned something new today and not commit the mistakes that these lovely ladies did. I leave you with a fluffy, yummy quiz. Stay tune for my next blog to know the answer.
Hip, Hip, Hooray, to all make-up pioneers!
Mel G.
Make-Up 101 Trivia Question
In the early 1900s Maybelline was known to specialize in what area?
a) Eyeliner b) Lipstick c) Mascara d) Lip-gloss e) I give up
Makeup Tools
Hello Makeupnistas!
Beneath the makeup and behind the smile I’m just a girl who wishes for the world. ~M.Monroe
Welcome to my Makeup Haven muñecas (dolls in Spanish)! For years I’ve had a cosmetic & fashion fusion love which I never took heed to pursue. Until the day we welcomed the new year 2011 and decided to add this passion as one of my resolutions. I purchased my first two makeup books from Kevyn Aucoin which took my passion to the next level. On February 2011, I participated in the New York City 2011 Plitzs Fashion Show and started working to put my name and talent out to the world . Since then I decided to freelance and have booked numerous bridal parties and other special events.
On my blog I’m going to be more than happy to provide helpful make-up tips to the women that struggle applying makeup. I will share my thoughts on the latest trends, hottest make-up item, and advice on make-up application. I hope to inspire individuals by reminding them that it’s never too late to shoot for your dreams.
Need a Make-Up Artist? I’m only a Peep, Like, Email, Phone-call away. I’ll enhance your natural beauty and help you walk out like the ultimate girl gone Makeup-nista!
Be Fantabulous. Be Fierce. Face Confidence


